Data Masking with Delphix
This section describes a solution template that you can use to mask sensitive data with the Azure Data Factory / Azure Synapse supported database connectors using the Delphix Continuous Compliance Engine. For more information on Continuous Compliance , see Continuous Compliance documentation.
Prerequisites
- Azure subscription - If you don’t have an Azure subscription, create a free Azure account before you begin.
- Delphix Continuous Compliance Engine - You must purchase a Delphix Continuous Compliance Engine. If you don’t have a Delphix Continuous Compliance Engine, create a Delphix Continuous Compliance Engine in Azure and register your engine. Refer to Azure Installation for more details on installing and configuring a Delphix Continuous Compliance Engine in Azure.
- Azure Key Vault - Username & Password to login into the Delphix Continuous Compliance Engine should be present in Azure Key Vault. Adequate permissions must be provided to access both the username and password information.
- Linked Service - Linked Service to connect your dataset to the source database, fileshare, & intermediate containers.
- Source Dataset - A source dataset containing unmasked data that can be connected from the ADF pipelines.
- Fileformat - Fileformat should have been uploaded on the Delphix Continuous Compliance Engine. It can either be done manually or by running the Sensitive Data Discovery with the Delphix pipeline. If the fileformat has been uploaded manually, users can skip running the Sensitive Data Discovery with the Delphix pipeline.
- Fileshare - Fileshare to host source (unmasked) data and target (masked) data. It should contain the Source and Target directories. For more information on steps to create Fileshare, refer to Microsoft documentation.
- Mount Point - Mount Point creation from the Delphix Continuous Compliance Engine to connect to source and target directory within Fileshare. It is required so that Delphix can read the source data from Azure and write masked data to Azure. Refer to Managing Remote Mounts to know how to create Mount Point in the Delphix Compliance Engine.
-
Container and FileShare Root Folders - A dedicated container and a folder in the file share for processing. The values for these would be needed in the
ContainerRootFolderandFileShareRootFolderparameters respectively.Note
The below is an example of a sample request for mount Fileshare.
{ "mountName": "<Name of your mountpoint>", "hostAddress": "<Host Address of your File share>", "mountPath": "<FileShare mount name>", "type": "CIFS", "options": "username=<storage account username>,password=<FileShare mount password>", "connectOnStartup": true }-
The above step is not needed if you will use this pipeline after executing the Sensitive Data Discovery Pipeline.
-
HostAddress of your Storage Account usually has the following pattern
<Storage Account name>.file.core.windows.net -
To find username or password for the Fileshare, refer to Step 7 in this document. To view the script, click the Show Script button. The username and password information can be found in the script.
-
-
Delphix Continuous Compliance Engine requires the below steps before proceeding ahead with the masking job creation:
-
Add source and target environment & add connectors for both.
Note
This step is not needed if you will use this pipeline after executing the Sensitive Data Discovery Pipeline.
-
RuleSet & Inventory creation is required only for the target environment.
-
While creating the inventory, ensure that you set the header information by clicking on the Record Types on the inventory screen. To do so, you must perform the below steps:
- Click on Record Types.
- Click on Header.
- Select Header from Header/Body/Trailer.
- Set Number of lines to 1.
- Set Record name to Header.
-
Create and trigger profiling Job. For more information on profiling, refer to the Delphix Continuous Compliance documentation.
- The masking Job should have been manually created in the Delphix Continuous Compliance Engine. While creating the masking job, you must select the “On The Fly” masking. It ensures that source data remains intact in a masking job failure scenario. For more information on creating a masking job, refer to the Delphix Continuous Compliance documentation.
-
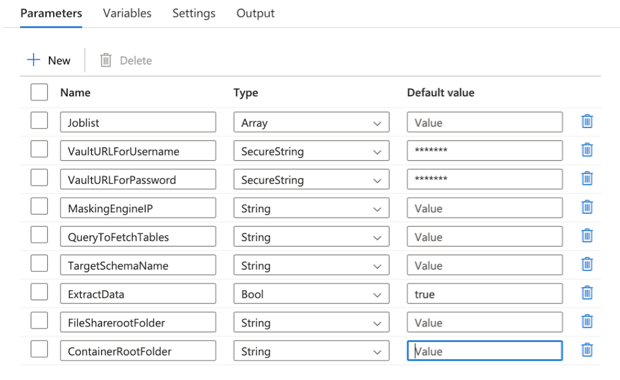
Input Parameters
This template requires the following input parameters:
- Joblist - Masking job ID to be invoked. For example, [5,10] where 5 & 10 are the ID of the masking job on the Delphix Continuous Compliance Engine.
- VaultURLForUsername - Key Vault URL to fetch the Delphix Continuous Compliance Engine username. The URL is structured as
{VaultBaseURL}/secrets/{secret-name}?api-version={keyVaultVersion}. - VaultURLForPassword - Key Vault URL to fetch the Delphix Continuous Compliance Engine password. The URL is structured as
{VaultBaseURL}/secrets/{secret-name}?api-version={keyVaultVersion}. - MaskingEngineIP - IP of the Delphix Continuous Compliance Engine.
- QueryToFetchTables - Query to fetch schema name & table name from the source database. This query fetches the schema name and table name for all tables that are required in the target data source. The query given in the below example can be modified based on the source database.
For example,SELECT TABLE_SCHEMA,TABLE_NAME FROM information_schema.TABLES WHERE TABLE_SCHEMA = '{SCHEMA NAME}'. - TargetSchemaName - Schema name as required on the target database.
- ExtractData - Parameter to decide if source data needs to be extracted from the source dataset or if you want to directly proceed with the masking operation. By default, the value of this parameter is set to
Truewhich means that the pipeline will extract the data from the source dataset. If you want to skip the extract step, then you must set this parameter toFalseand proceed with the pipeline. - ContainerRootFolder - Name of the container where the masked data and file formats would be stored.
- FileShareRootFolder - Name of the root folder in the file share that would be used to store unmasked and masked data.
About this Template
This template extracts data from a source data store, executes Delphix Masking Job(s) to mask/replace sensitive data in the extract using appropriate algorithms, and then, loads the compliant data into the target datastore. Multiple masking jobs created in the Delphix Continuous Compliance engine can be parallelly invoked using this pipeline.
The end result of this pipeline will be to load the masked data on the target data source.
The template contains the following activities:
-
If Condition activityexecutes the pipeline to extract the source dataset if source data extraction is required.Execute Pipeline activityextracts the source data.
-
Web activityto fetch the username from Azure Key Vault to login into Delphix Continuous Compliance Engine. Web activityto fetch the password from Azure Key Vault to login into Delphix Continuous Compliance Engine.Web activitylogins into the Delphix Continuous Compliance Engine using the credentials that are retrieved from Azure Key Vault.-
ForEach activityiterates over the masking job ID. Iteration through each masking job id will invoke its corresponding masking job in the Delphix Continuous Compliance Engine. The successful run of the masking job will write masked data into the target directory of the Fileshare. The pipeline is successful only if every invoked masking job succeeds else the pipeline fails.Execute Pipeline activitytriggers the masking job in parallel.
-
Fail activitystops the execution if one or more masking job fails or are cancelled. Get Metadata activitygets the list of all the unmasked files in the target directory of the Fileshare.-
ForEach activityiterates over all the unmasked files present in the target directory of the Fileshare.Copy data activitycopies the unmasked files from the source directory of the Fileshare to the target directory of the Fileshare.
-
Get Metadata activitygets the list of all the files in the target directory of the Fileshare. -
ForEach activityiterates over all the files present in the target directory of the Fileshare.ForEachwill have the following activities:Copy data activitythat copies the files from the target directory of the Fileshare to Blob storage.- Another
Copy data activitythat copies the data from the Blob Storage to Synapse. Delete activityto clean up data in your source and target file share and masked data folder in the root container.
How to Use this Template
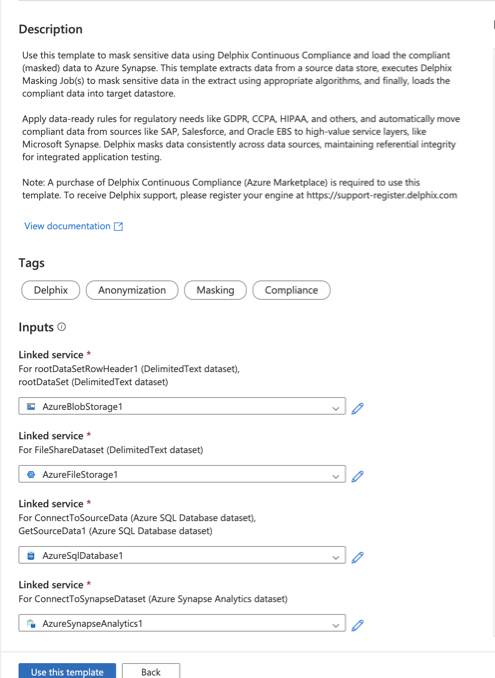
- Go to the template gallery.
- Select the Data Masking with Delphix template.
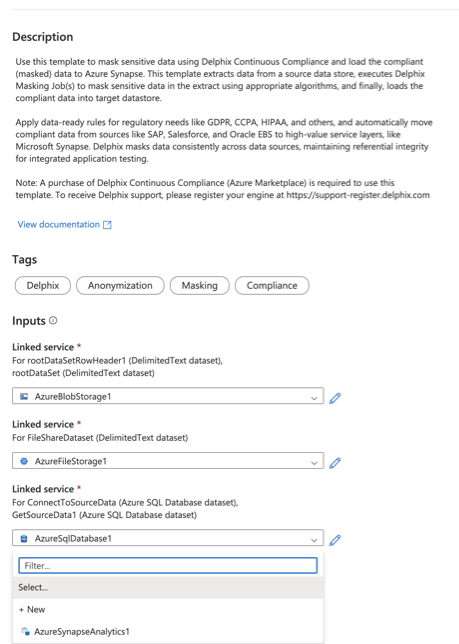
- Select the Linked Service to connect to the blob store where files with masked data will be created. If no service is available to select, click on + New and add the Linked Service.
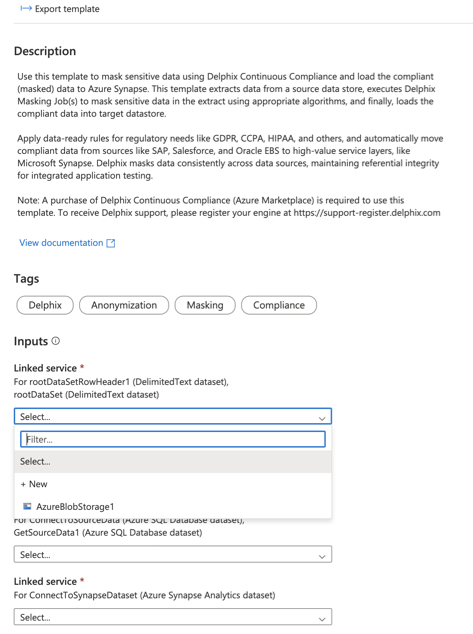
- Select the Linked Service to connect to the Fileshare that is connected with the Delphix Continuous Compliance Engine. If no service is available to select, click on + New and add the Linked Service.
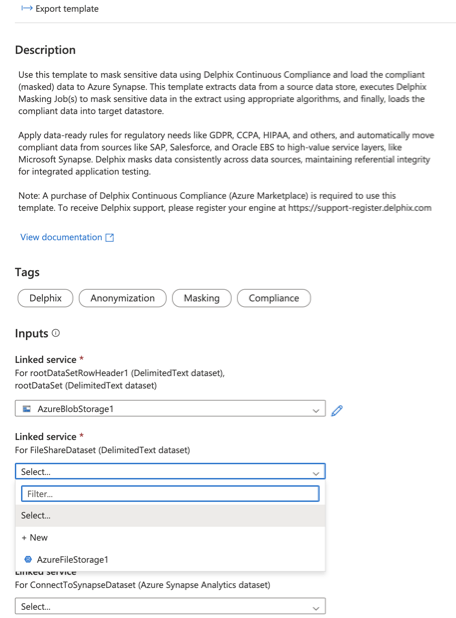
- Select the linked service to connect to the source database from the dropdown. If no service is available to select, click on + New and add the Linked Service.
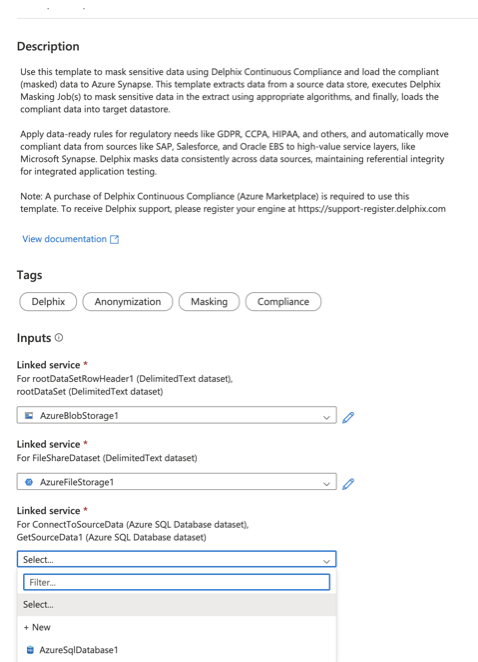
- Select the linked service to connect to the Synapse database. If no service is available to select, click on + New and add the Linked Service.
- Click Use this Template.
You would see a pipeline created. - Click Debug to start the pipeline. You must provide the input parameters to proceed further.
-
After clicking on Debug, the Delphix Continuous Compliance Engine will invoke the masking job(s) corresponding to the masking job ID that was provided in the input parameters.
Note
You can provide multiple masking jobs at the same time. Once all the masking jobs complete successfully, the resulting compliant data will be pushed to the target datastore.
-
The pipeline can be triggered either by clicking on **Debug option or by using Add Trigger option. When the pipeline is run, the Delphix Continuous Compliance Engine will extract data from the source datastore and then invoke the masking job(s) provided in the input parameters. (Note, the user can provide multiple masking jobs at the same time as well). Once all masking jobs complete successfully, the resulting compliant data will be pushed to the target datastore.
- Running the masking pipeline in debug mode will result in masking jobs to be triggered sequentially rather than in parallel. You can use the add trigger option in case you want to do parallel execution.
- The pipeline will create tables at your target destination, but the schema structure (column types, indices, etc.) may differ from the source. It is recommended to create tables on the target in order to guarantee schema consistency.
Next Steps
For any questions, bugs, or feature requests, contact us at ask-integrations@delphix.com or via Delphix Community Portal.